cases & bags

Showing posts with label aperture. Show all posts

Saturday, 1 October 2011

The monochrome

Hi,

It is been awhile after the last post in Putrajaya. Today, I challenge to shoot some so called "old type" or "black and white" photos, we called it Monochrome. As I remember, I did mentioned about I like black and white photos than colour photos. 

It is also difficult to shoot in Monochrome because there is only two colours, you need to be careful or you will not get the "distance" of the subject and the background. 


And Monochrome photos are very difficult in movement because the result might just blur and you do not feel any "speed" on it. Our eye just cannot judge it while we already used to colourful photos.


The same case appear while the ball is spinning. I would say if you really insist in capture a moving subject in Monochrome, I suggest you find a subject which is dark in colour such as black, dark blue, dark red and etc. Sorry I am not good in the name of colour :P Well, as you can see, the spinning ball is actually in yellow colour and you can slightly see it is spinning because the ball has a number in black colour. Therefore you see some reflection and "see" it is spinning :)


It is better to remain "still" subjects and maximize the Aperture by lower the f-number. Guess what, you can see the distance of the subjects now. :)


If that cannot satisfy you, you can try to capture the nearest background of the subjects. As you can see, the photo below was included the border of the table, it gave more "distance" and you can feel the photo "live".


There is another way to capture the "distance" if you find maximizing the Aperture does not work. The reason you lower your f-number does not work might because your f-number not small enough, or cannot be smaller. Well,  all you need to do is zoom in to the subjects, and of course using the smallest f-number as well.


Also, in case you got enough exposure (some shops have not enough lighting), you need to use a higher ISO to get your desire exposure. But beware, higher ISO might capture noises and spoil your photo.


Choosing a correct angle is important, well, I cannot teach you on that because I am still working on it as well LOL.

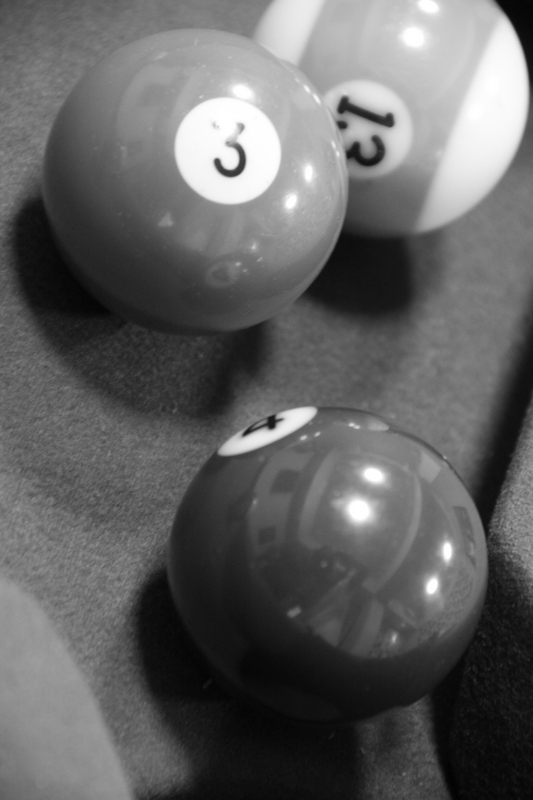


Sometimes, you just need to shoot in different angle in order to gain more "intuition" (I do not use "experience" because I think photography is more on "imagination" instead of just "experience) so you will know how to shoot in different subjects in different angle next time.


Do you want to know more? Please "like" my post ^^


Tuesday, 12 July 2011

Desa Park City

I found a nice place to shoot recently, its called Desa Park City. It is a place near Kepong. If you coming from the direction of Sungai Buloh, just go under the flyover and turn right, then you will see a junction on the left. You  will see some big words DESA PARK CITY instead of HOLLYWOOD. Haha :P


Many photographers come to this place every evening, or maybe after work. I would say this place still under very good maintenance, so far. But I bet it would/must maintain well because this location is very valuable right now.  


There are a lot of fish in the lake, but swimming and fishing are definitely not allowed. I bet most visitors come because of this lake, and wait for the sunset, it just beautiful. Also, visitors like to bring along their dogs, I guess they are enthusiastic in dogs and you can hear something like "you have a beautiful dog", "your dogs are so cute", "she (the dog of course) is so lovely"... ...No offence ^^


Too bad, there isn't any colourful flower around, just trees and vivid green grass. Still, they got the smell of nature. :) Just look at this little grass, it is strong and grow on the rock. Life is really amazing, you can't imagine how tough a grass can be. The background is too sharp, lets try a smaller f-number to make the little grass become the main actor.


Now, you can see the background become blurred and you will probably focus on the little grass instead of the background. 


Do you want to know more? Please "like" the posts ^^


Thursday, 23 June 2011

Shooting in Manual Mode

First, you need to select the Manual Mode at the camera Mode Dial. You might found your Dial looks different, but I'm sure you can find the M icon ( In red circle) at the Dial :)


So, what does Manual Mode do? Let's begin. These are the setting for my camera, but it will be about the same as yours as well. Do not worry ^^

Aperture = Selectable
Shutter Speed = Selectable
Exposure = Cannot be Set
ISO Speed = Selectable
Picture Style = Selectable
White Balance = Selectable
AF Mode = Selectable
AF Point Selection = Selectable
Drive Mode = Selectable
Metering Mode = Selectable
Built-in Flash = Selectable

Most of the settings are selectable in Manual Mode, it is about the SAME as Program AE Mode.  I would say there is no more honeymoon for user who choose this Mode. There are many things to aware and you need to try different setting in different situation, Manually :)

The Shutter Speed and Aperture are selectable. Therefore, the Exposure will indicate the result according to your Shutter Speed and Aperture setting. Do you remember the chapter "How does Exposure work"? Let's see the steps below. 

1) Set your desire Shutter Speed
- Depends on what you want to shoot and style you want to create in your picture. Blur or Freeze motion. Please refer to chapter "Shooting in Shutter-Priority Mode".

2) Set your desire f-number. Do you still remember the chapter "Controlling the Depth of Field" ? I think I should repeat it again, simple one.

- If you higher the f-number, the Depth of Field will be wider. Therefore, both in front and back of the subject will be focus. 

- If you lower the f-number, the Depth of Field will be narrower. Therefore, only the subject is sharp and clear, most photographers like to create a soft background for portraits.

3) Set your desire ISO Speeds.
-If you found you can't get a satisfy result because of the dark environment, set the ISO speeds higher in order to increase the Shutter Speed to freeze the motion.

4) Pay attention in your Exposure
- As I mentioned above, the Shutter Speed and Aperture are under your control. Therefore, the camera will indicate whether you have a correct Exposure. 


If you are underexposure or overexposure, the Exposure bar will blink (in Green Circle). Therefore, you can create your own style, dark or bright, blur or freeze, it all depends on the user now. 

- You are advised to skip directly to Step 11 because the AF Point, AF Mode, Metering Mode, Drive Mode, White Balance, Picture Style and Built-in Flash are about the Same as Exposure-Priority Mode.

5) Set your desire AF Point.
- You can select your desire AF Point in this Mode. Unlike Auto Mode, Portrait Mode, Landscape Mode and etc, you can now choose the point you want to be focused. The Red Square shows the selected AF Point.


6) Try to focus with Manual Focus.
- I strongly recommend the user who choose Aperture-Priority Mode use Manual Focus. All you need to do is push the button from AF to MF.


Well, although Auto Focus is very convenient in most of the time, you need to try Manual Focus in order to improve your skill. Also, Manual Focus save more battery than Auto Focus. If you do not have a Battery Grip ( I only use it when I attach the External Flash ), you can use Manual Focus so your battery can last for the whole day.

7) Set the AF Mode.
- I'm sorry to tell you that you are not allowed to use AF Mode if you are using Manual Focus. It is because once you selected Manual Focus, all the AF Mode selection will not works. Switch back to Auto Focus to capture moving objects. :)

8) Try different Drive Mode for continuous action.
- There are 5 different Drive Mode for my camera, which are Single, Low-Speed continuous Shutter, High-Speed Continuous Shutter, 2 seconds Timer and 10 seconds Timer.

The first thing you need to aware is light source. If the environment is too dark, you can forget about the Continuous Shutter because you will not get a sharp and clear picture. Please refer back to chapter "How to Freeze Motion?".

9) Set your desire Metering Mode.
- Please refer back to chapter "How does Metering Mode work?"

10) Set your desire Drive Mode
- Please refer back to chapter "How does Drive Mode work?"

11) Manual Mode in dark environment
- Most photographer use Manual Mode in dark environment which difficult to get Exposure. Since Shutter Speed is under your control, you can even shoot starlit sky now. 

Although Shutter-Priority Mode can select your desire Shutter Speed ( or even open with BULK whole night for starlit sky), but you can't control the f-number. Therefore, you might not get the result you want. What you see with your eyes is different with the camera at night. 

You might feel difficult at first because you do not know the Exposure level. But you can look at the Exposure level indicator in the LCD Panel or viewfinder. Once the Exposure reach your desire level, close the shutter immediately before it overexpose. 


Sunday, 19 June 2011

Shooting in Aperture-Priority Mode

First, you need to select the Aperture-Priority Mode at the camera Mode Dial. You might found your Dial looks different, but I'm sure you can find the Av icon ( In red circle) at the Dial :)


So, what does Aperture-Priority Mode do? Let's begin. These are the setting for my camera, but it will be about the same as yours as well. Do not worry ^^

Aperture = Selectable
Shutter Speed = Auto
Exposure = Selectable
ISO Speed = Selectable
Picture Style = Selectable
White Balance = Selectable
AF Mode = Selectable
AF Point Selection = Selectable
Drive Mode = Selectable
Metering Mode = Selectable
Built-in Flash = Selectable

Most of the settings are selectable in Aperture-Priority Mode, it is about the SAME as Exposure-Priority Mode.  I would say there is no more honeymoon for user who choose this Mode. There are many things to aware and you need to try different setting in different situation, Manually :)

The Shutter Speed is in Auto. Therefore, you need to pay attention to the Aperture, Exposure and ISO Speeds for a normal shooting, just ignore the white balance, drive mode and etc at the beginning. If you choose Aperture Mode, I believe you want the subject to stand out more and blur unwanted background in most case. I will show it step by step, in simple way.

1) Set your desire Exposure.
2) Set your desire f-number. Do you still remember the chapter "Controlling the Depth of Field" ? I think I should repeat it again, simple one.

- If you higher the f-number, the Depth of Field will be wider. Therefore, both in front and back of the subject will be focus. 

- If you lower the f-number, the Depth of Field will be narrower. Therefore, only the subject is sharp and clear, most photographers like to create a soft background for portraits.

- I believe it is rare to see the Shutter Speed blinking (In Green Circle ) to show an error because of overexposure or underexposure. If you maximize the f-number and Exposure, the Shutter Speed will be slower, and you probably will get a blur image instead of overexposure ( Unless you shoot to the Sun, It is not recommended to do so without a proper filter ).


- If you minimize the f-number and Exposure, trust me, the Shutter Speed is fast enough for you to play around. :)

3) Set your desire ISO Speeds.
-If you found you can't get a satisfy result because of the dark environment, set the ISO speeds higher in order to increase the Shutter Speed to freeze the motion.

- You are advised to skip directly to Step 10 because the AF Point, AF Mode, Metering Mode, Drive Mode, White Balance, Picture Style and Built-in Flash are about the Same as Exposure-Priority Mode.

4) Set your desire AF Point.
- You can select your desire AF Point in this Mode. Unlike Auto Mode, Portrait Mode, Landscape Mode and etc, you can now choose the point you want to be focused. The Red Square shows the selected AF Point.


5) Try to focus with Manual Focus.
- I strongly recommend the user who choose Aperture-Priority Mode use Manual Focus. All you need to do is push the button from AF to MF.


Well, although Auto Focus is very convenient in most of the time, you need to try Manual Focus in order to improve your skill. Also, Manual Focus save more battery than Auto Focus. If you do not have a Battery Grip ( I only use it when I attach the External Flash ), you can use Manual Focus so your battery can last for the whole day.

6) Set the AF Mode.
- I'm sorry to tell you that you are not allowed to use AF Mode if you are using Manual Focus. It is because once you selected Manual Focus, all the AF Mode selection will not works. Switch back to Auto Focus to capture moving objects. :)

7) Try different Drive Mode for continuous action.
- There are 5 different Drive Mode for my camera, which are Single, Low-Speed continuous Shutter, High-Speed Continuous Shutter, 2 seconds Timer and 10 seconds Timer.

The first thing you need to aware is light source. If the environment is too dark, you can forget about the Continuous Shutter because you will not get a sharp and clear picture. Please refer back to chapter "How to Freeze Motion?".

8) Set your desire Metering Mode.
- Please refer back to chapter "How does Metering Mode work?"

9) Set your desire Drive Mode
- Please refer back to chapter "How does Drive Mode work?"

10) Set your desire White Balance and Picture Style.
- As a photographer, remember one important thing.

"Arrive the Destination EARLIER and Try the Best White Balance and Picture Style Setting."

Well, I believe you will need to understand the environment before the wedding dinner or party get started. The light sources are not going to change (unless at outdoors) and probably you can try on different White Balance and Picture Style, look for the best setting so you will not screw your job. :)


Thursday, 16 June 2011

Shooting in Shutter-Priority Mode

First, you need to select the Shutter-Priority Mode at the camera Mode Dial. You might found your Dial looks different, but I'm sure you can find the Tv icon ( In red circle) at the Dial :)


So, what does Shutter-Priority Mode do? Let's begin. These are the setting for my camera, but it will be about the same as yours as well. Do not worry ^^

Aperture = Auto
Shutter Speed = Selectable
Exposure = Selectable
ISO Speed = Selectable
Picture Style = Selectable
White Balance = Selectable
AF Mode = Selectable
AF Point Selection = Selectable
Drive Mode = Selectable
Metering Mode = Selectable
Built-in Flash = Selectable

Most of the settings are selectable in Shutter-Priority Mode, it is about the SAME as Exposure-Priority Mode.  I would say there is no more honeymoon for user who choose this Mode. There are many things to aware and you need to try different setting in different situation, Manually :)

The Aperture is in Auto. Therefore, you need to pay attention to the Shutter Speed, Exposure and ISO Speeds for a normal shooting, just ignore the white balance, drive mode and etc at the beginning. I believe you want to freeze motion if you choose Shutter-Priority Mode. But all these settings will affect each other all the time. I will show it step by step, in simple way.

1) Set your desire Exposure.

2) Set your desire Shutter Speed. 
- If the environment is not very bright, maybe cloudy or at indoor, you will see the f-number blinking ( In  Green Circle) once you set the Shutter Speed too fast. It is because according to your desire Exposure, you are not allow to use certain Shutter Speed. Therefore, the Aperture reach lowest f-number limit and it blink to show as an error.


- If you select a slower Shutter Speed, notice the f-number gets higher in order to balance the Exposure. Once you Shutter Speed get too slow, the f-number might reach the highest limit and it will blink to show as an error as well. 

3) Set your desire ISO Speeds.
-If you found you can't get a satisfy result because of the dark environment, set the ISO speeds higher in order to increase the Shutter Speed to freeze the motion.

- You are advised to skip directly to Step 11 because the AF Point, AF Mode, Metering Mode, Drive Mode, White Balance, Picture Style and Built-in Flash are about the Same as Program AE Mode.

4) Set your desire AF Point.
- You can select your desire AF Point in this Mode. Unlike Auto Mode, Portrait Mode, Landscape Mode and etc, you can now choose the point you want to be focused. The Red Square shows the selected AF Point.


5) Try to focus with Manual Focus.
- I strongly recommend the user who choose Shutter-Priority Mode use Manual Focus. All you need to do is push the button from AF to MF.


Well, although Auto Focus is very convenient in most of the time, you need to try Manual Focus in order to improve your skill. Also, Manual Focus save more battery than Auto Focus. If you do not have a Battery Grip ( I only use it when I attach the External Flash ), you can use Manual Focus so your battery can last for the whole day.


6) Set the AF Mode.
- I'm sorry to tell you that you are not allowed to use AF Mode if you are using Manual Focus. It is because once you selected Manual Focus, all the AF Mode selection will not works. Switch back to Auto Focus to capture moving objects. :)

7) Try different Drive Mode for continuous action.
- There are 5 different Drive Mode for my camera, which are Single, Low-Speed continuous Shutter, High-Speed Continuous Shutter, 2 seconds Timer and 10 seconds Timer.

The first thing you need to aware is light source. If the environment is too dark, you can forget about the Continuous Shutter because you will not get a sharp and clear picture. Please refer back to chapter "How to Freeze Motion?".

8) Set your desire White Balance and Picture Style.
- Please refer back to chapter "How does White Balance work?" and "How does Picture Style work?"

9) Set your desire Metering Mode.
- Please refer back to chapter "How does Metering Mode work?"

10) Set your desire Drive Mode
- Please refer back to chapter "How does Drive Mode work?"

11) There are some different between Aperture-Priority Mode and Shutter-Priority Mode. The first thing, of course, it is to control the Shutter Speed in this Mode. And most of the time, user who choose Shutter-Priority Mode shoot with a faster Shutter Speed instead of a slower Shutter Speed.

Do you ever notice, the faster Shutter Speed will lose some details at the background? You don't, am I right? Your goal might only to freeze the motion of the focused object, you do not care about the background? Let's discuss in next chapter. :)


Do you want to know more? Please "like" my posts ^^

Tuesday, 14 June 2011

Shooting in Program AE Mode.

First, you need to select the Program AE Mode at the camera Mode Dial. You might found your Dial looks different, but I'm sure you can find the P icon ( In red circle) at the Dial :)


So, what does Program AE (Or I called it as Exposure-Priority) Mode do? Let's begin. These are the setting for my camera, but it will be about the same as yours as well. Do not worry ^^

Aperture = Program Shift
Shutter Speed = Program Shift
Exposure = Selectable
ISO Speed = Selectable
Picture Style = Selectable
White Balance = Selectable
AF Mode = Selectable
AF Point Selection = Selectable
Drive Mode = Selectable
Metering Mode = Selectable
Built-in Flash = Selectable

Most of the settings are selectable in Program AE Mode, it is about the SAME as Shutter-Priority Mode.  I would say there is no more honeymoon for user who choose this Mode. There are many things to aware and you need to try different setting in different situation, Manually :)

The Aperture and Shutter Speed are in Program Shift, or should called it Auto. Therefore, you need to pay attention to the Exposure and ISO Speeds for a normal shooting, just ignore the white balance, drive mode and etc at the beginning. Program AE Mode is like Auto Mode, but you are allowed to control AF Mode, Metering, White Balance and etc, as shown as above.  I will show it step by step, in simple way.

1) Set your desire Exposure.
- The Shutter Speed and Aperture will automatically shift in order to get the Exposure you want. It is suitable for most shooting. 

2) Set your desire ISO Speeds.
-If you found you can't get a satisfy result because of the dark environment, a higher ISO speeds will give a wider option for the camera to adjust and get a balance setting for both Shutter Speed and Aperture. 

3) Set your desire AF Point.
- You can select your desire AF Point in this Mode. Unlike Auto Mode, Portrait Mode, Landscape Mode and etc, you can now choose the point you want to be focused. The Red Square shows the selected AF Point.


4) Try to focus with Manual Focus.
- I strongly recommend the user who choose Shutter-Priority Mode use Manual Focus. All you need to do is push the button from AF to MF.


Well, although Auto Focus is very convenient in most of the time, you need to try Manual Focus in order to improve your skill. Also, Manual Focus save more battery than Auto Focus. If you do not have a Battery Grip ( I only use it when I attach the External Flash ), you can use Manual Focus so your battery can last for the whole day.

5) Set the AF Mode.
- I'm sorry to tell you that you are not allowed to use AF Mode if you are using Manual Focus. It is because once you selected Manual Focus, all the AF Mode selection will not works. Switch back to Auto Focus to capture moving objects. :)

6) Try different Drive Mode for continuous action.
- There are 5 different Drive Mode for my camera, which are Single, Low-Speed continuous Shutter, High-Speed Continuous Shutter, 2 seconds Timer and 10 seconds Timer.

The first thing you need to aware is light source. If the environment is too dark, you can forget about the Continuous Shutter because you will not get a sharp and clear picture. Please refer back to chapter "How to Freeze Motion?".

7) Set your desire White Balance and Picture Style.
- Please refer back to chapter "How does White Balance work?" and "How does Picture Style work?"

8) Set your desire Metering Mode.
- Please refer back to chapter "How does Metering Mode work?"

9) Set your desire Drive Mode
- Please refer back to chapter "How does Drive Mode work?"

10) Freeze motion and Depth of Field
- In Program AE Mode, you are allowed to select a higher or lower f-number for Certain Model of camera. The Shutter will shift to the proper speed in order to get your desire Exposure as well.  But of course, the results might not as good as Shutter-Priority Mode and Aperture-Priority Mode.

Actually, Program AE Mode is the gentle start for users who want to manually control the camera settings. You will see the differences when you move on to further chapters.


Do you want to know more? Please "like" my posts ^^